Integrating a CRM in you project Forms
Setting up the Plugin
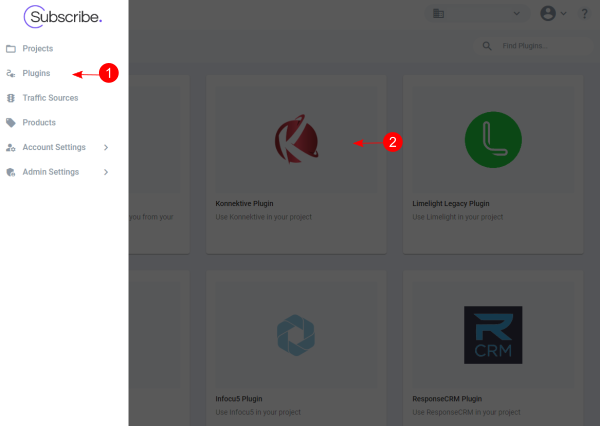
1. Head over to the Plugins Section located in the left hand side menu.
2. From the list of plugins, select the plugin you wish to integrate in your project. Subscribe also allows you to integrate as many CRMs as you want as well as multiples of the same CRM. In the example below, we have selected Konnektive Plugin.
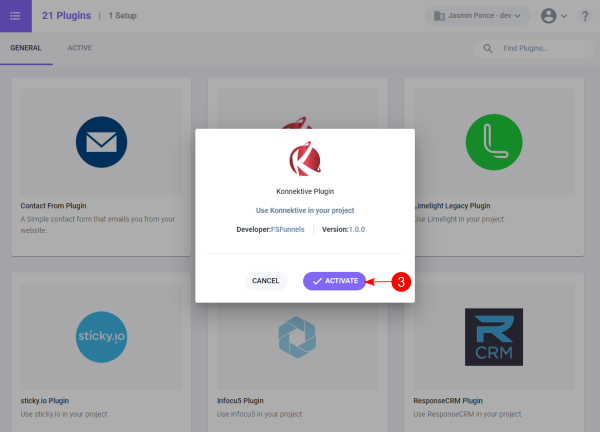
3. After selecting the plugin, a pop up window will apear prompting you to activate the plugin. Click on "Activate".
4. Activating a plugin will trigger a sidebar. In this sidebar, head over to Settings tab an input CRM information. This settings must be set in the CRM beforehand.
5. Click save and validate credentials.
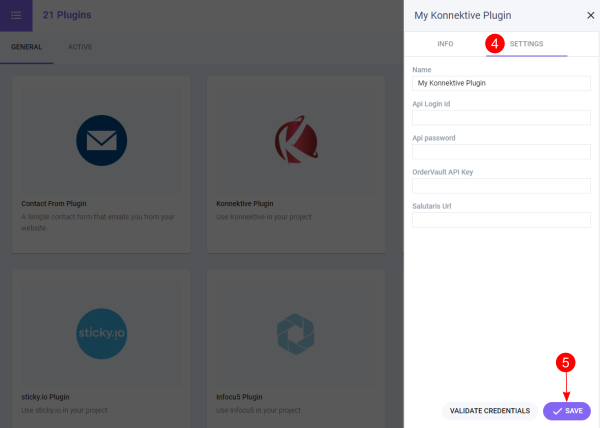
Note: If the information is correct you will se a "Success" message, if there is a discrepancy between the plugin information in the CRM and the information provided in Subscribe an error message will appear instead.
Form Integration
CRM integrations are primarily done in any Form elements throught your site.
Before proceeding with CRM integrations, make sure that your form fields have the correct names. Read CRM Form Foundational Setup article for more information.
Once your form has the correct attributes on each field:
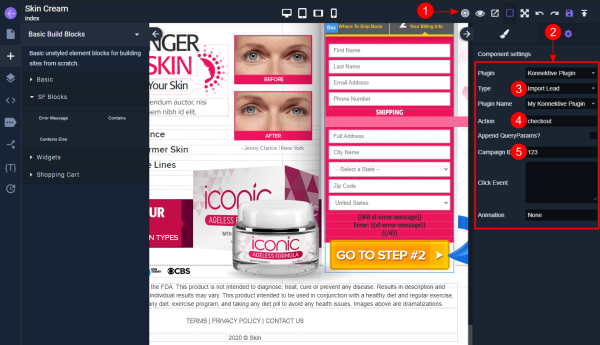
1. Select the form element by clicling on "Locate Form" button.
2. Whith the Form selected, head over to the configuration tab and configure your form by selecting an option for the Plugin, Form Type, Method and Action.
3. When selecting the Form Type, Subscribe configures your Form for this specific Form Type. To continue with the process, click the Locate Form.
4. Select the 'Action' to the next page in your flow. In the example below, the flow for this project indicated that checkout pages comes after index.
5. Input the Campaign ID for your poject. You can set this value as a token or leave it as a number. If you need more information about tokens.
The following articles provide information about Subscribe Tokens, tokenizing passages and CRM tokens
Error Messages
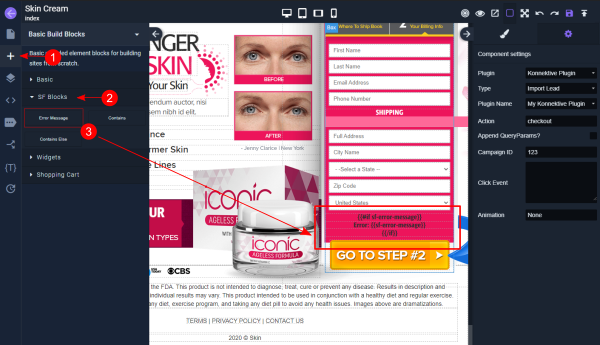
To display error messages when submitting a form, an "Error message" block can be added anywhere in your form.
1. Head over to Basic Build Blocks
2. Select SF Blocks
3. Under SF Blocks section, locate Error Message. Drag the block and drop it where you want the error to display.
Checkout Pages
For checkout pages with a single product input the product id in the Product Id field.
For checkout pages with multiple products":
Select each radio button or checkbox and under the settings tab, set each one of them with the name product with its corresponding product ID under Value.
1. Locate your checkout Form and hear over to the settings tab. Fill in information such as campaign id, productId etc.
Upsells
Typically, upsell forms are set to Import Upsell as their Form Type.
1. Locate your Upsell form. Input the upsell product Id in the Product ID field. If you have more upsells that override your current upsel product Id, input the new prouct ID under "Replace Product ID".
Watch the following video for more detailed information about integrating a CRM to your project.